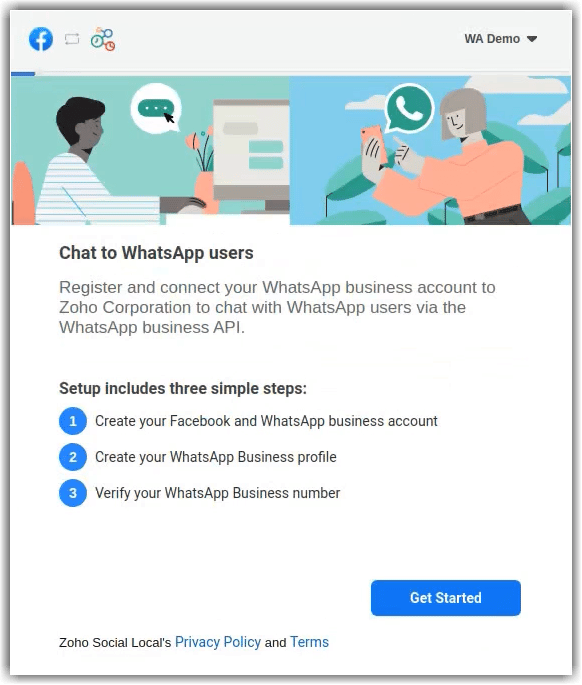
The WhatsApp messaging platform has gained huge popularity among businesses because of its quick and hassle-free messaging services. Because it allows customers to start the conversation with the business, customers have more control of their purchase decisions.
With that in mind, Zoho CRM has made possible an integration with WhatsApp. Below you’ll see the required steps to activate it:
Requirements
1. Facebook Business Manager account.
2. A verified business.
3. WhatsApp Business account.
4. A registered phone number to access the WhatsApp Business API. The phone number must meet the requirements mentioned in this page.
Instructions for the WhatsApp and Zoho CRM Integration
NOTE: Only an administrator can initiate this integration.
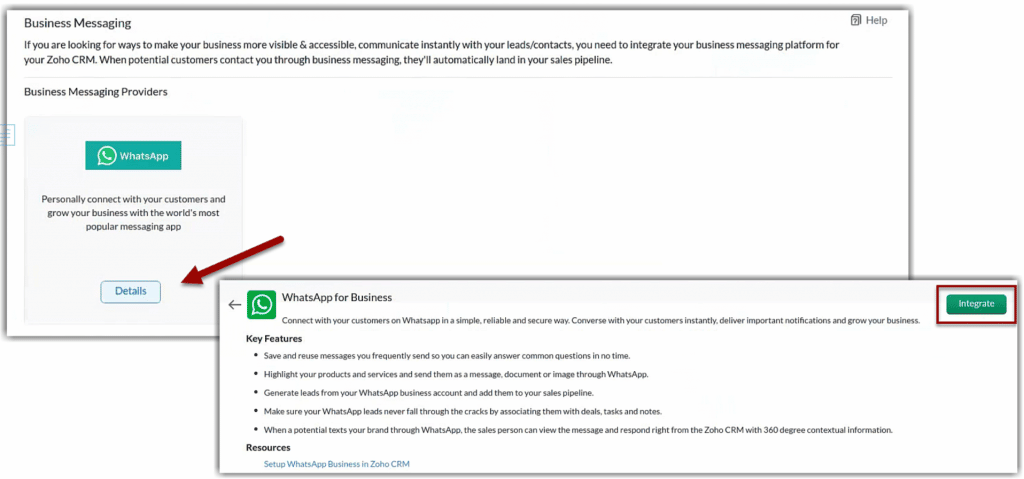
1. Go to Setup > Channels > Business Messaging.
2. Under WhatsApp, click Details > Integrate.
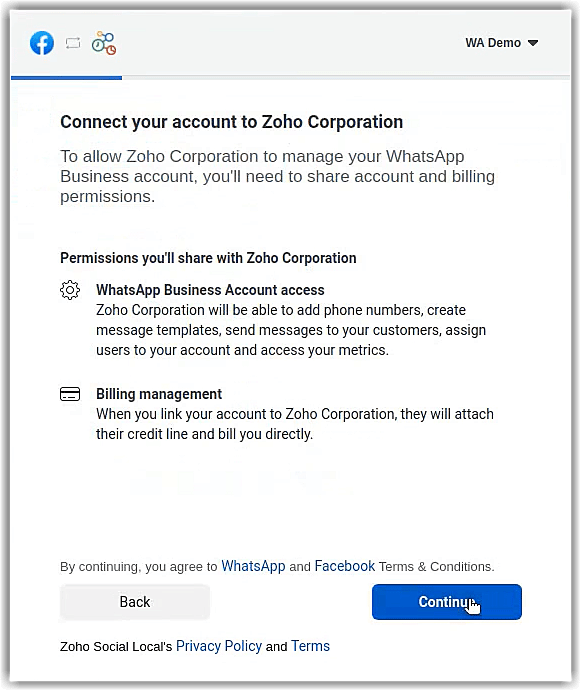
3. In the WhatsApp access request page, log in with Facebook Business Manager’s credentials.
4. Click Get Started.
5. Click Continue to give permission.
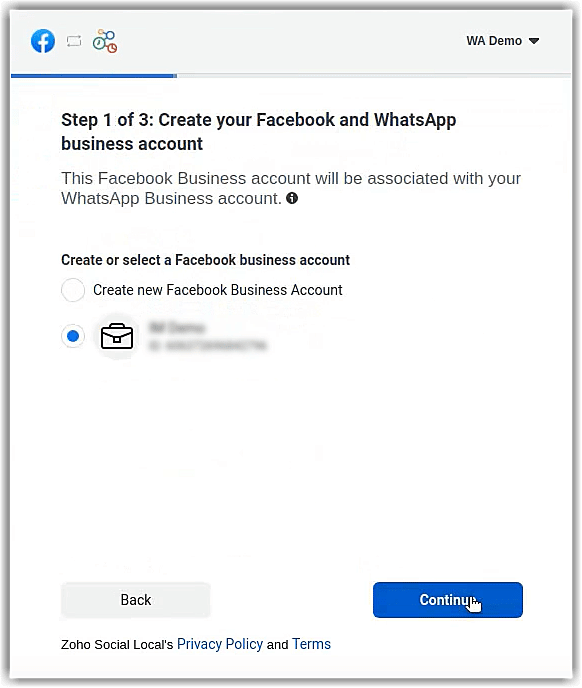
6. Create a new Facebook Business account or select existing account from the options.
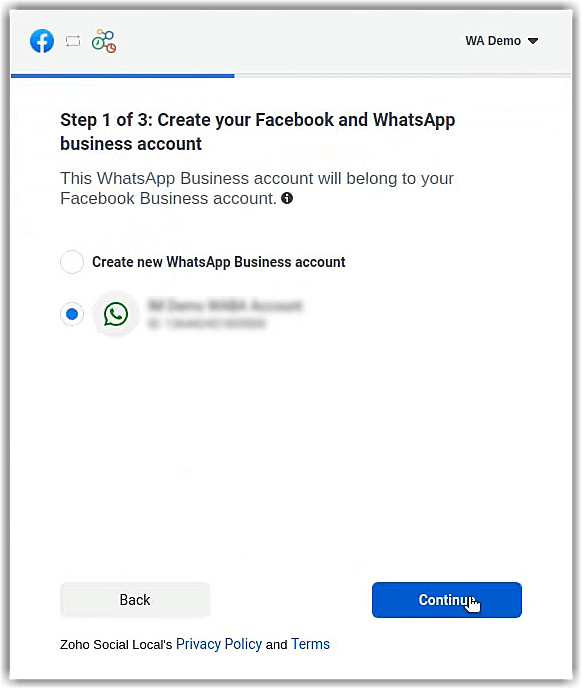
7. Create a new WhatsApp Business account or select existing accounts from the options. Then, click Continue.
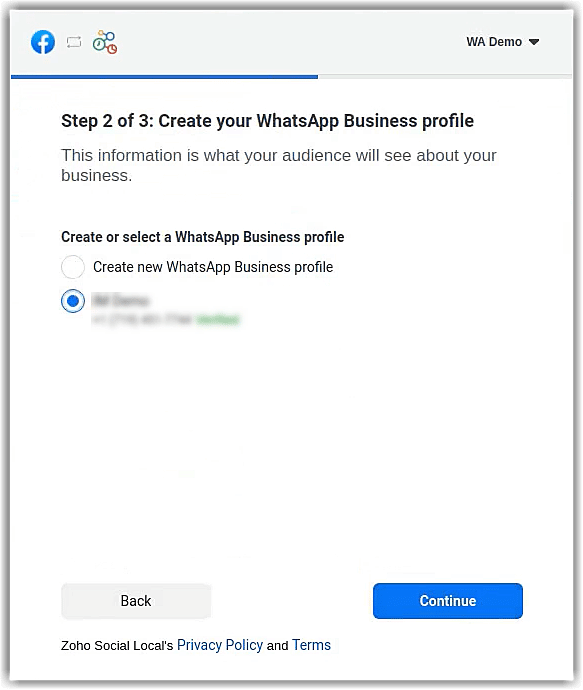
8. Create a new WhatsApp Business profile or select an existing profile from the options. Then, click Continue.
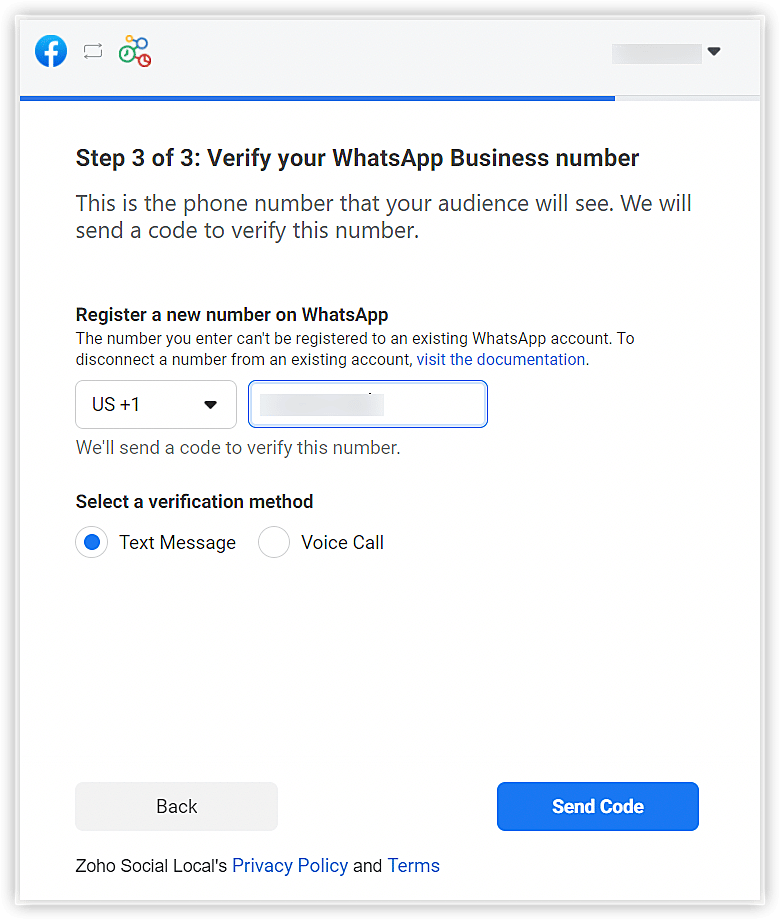
9. Verify your WhatsApp Business number.
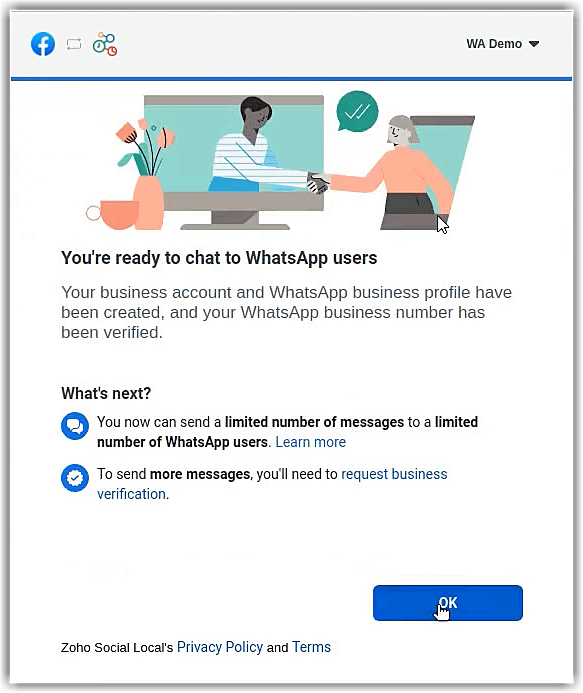
10. Click OK on the next screen.
11. Provide a nickname for the WhatsApp business profile in CRM and click Next.
- Provide the account preferences choosing from the dropdown options. In the Add as field, select Leads or Contacts.
- In the Assign to field, select users, groups, or roles.
- In the Choose Users field, select the users, groups, or roles.
12. When finished, click Save. The WhatsApp Business messaging account will now be activated.
NOTES:
- Once your business is verified, it will be reviewed for compliance with the WhatsApp Terms of Service and WhatsApp Commerce Policy.
- If you have rebranded your domain (domain-mapped accounts), you must enable third-party cookies in your browser before starting the integration.
- You can’t use WhatsApp phone numbers being used on other products. Only unused phone numbers can be used for the integration.
- Migration of existing phone numbers is not supported yet.
Business Message Charges, Buying Credits, and Auto Recharge
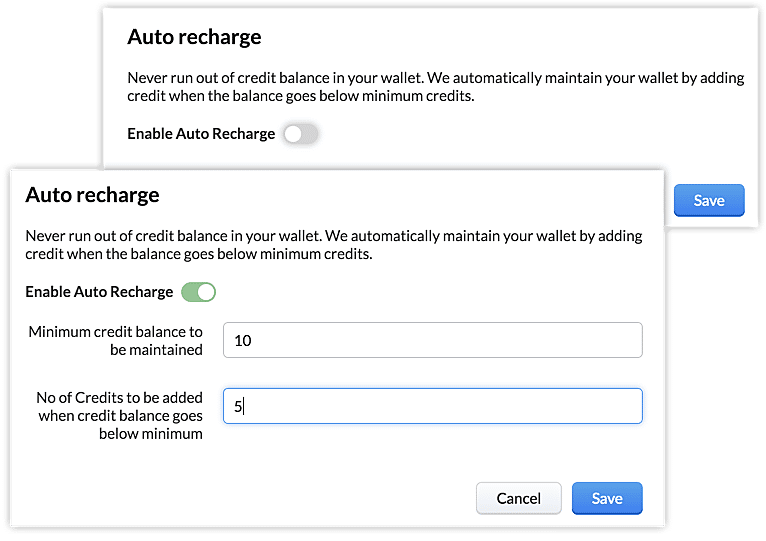
Messages sent by the company are charged. You can purchase credits based on the frequency of your usage so that the charges are automatically deducted from it. After the initial purchase of credits, you can use the auto recharge option to avoid running out of balance by setting the minimum number of credits that must be maintained in your account at any time. Also, you can indicate the number of credits that must be purchased when the limit is spent.
To buy credits:
1. Go to Setup > Channels > Business Messaging.
2. Click Buy Credits. This option will be available only after the phone number is active.
3. Enter the value. Then, click Next.
4. Click Make a payment.
To auto recharge:
1. Go to Setup > Channels > Business Messaging.
2. Click Auto Recharge.
3. Toggle on Enable Auto Recharge.
4. Complete the field Minimum credit balance to be maintained.
5. Complete the field Number of credits to be added when the balance is minimum. When finished, click Save.
How to Manage the Messages Tab
1. Filtering and setting view for messages
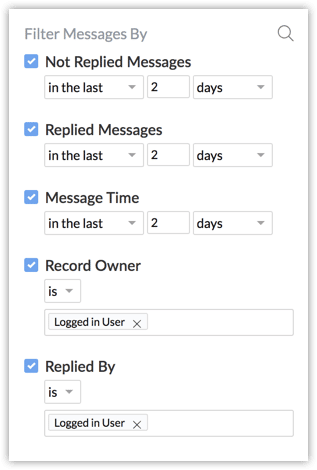
In the Messages module, users can utilize the following filters and set criteria to find a message quickly:
- Not replied in x days/weeks/months
- Replied in x days/weeks/months
- Message time in x days/weeks/months
- Record owner is x user or logged in user
- Replied by x user or logged in user
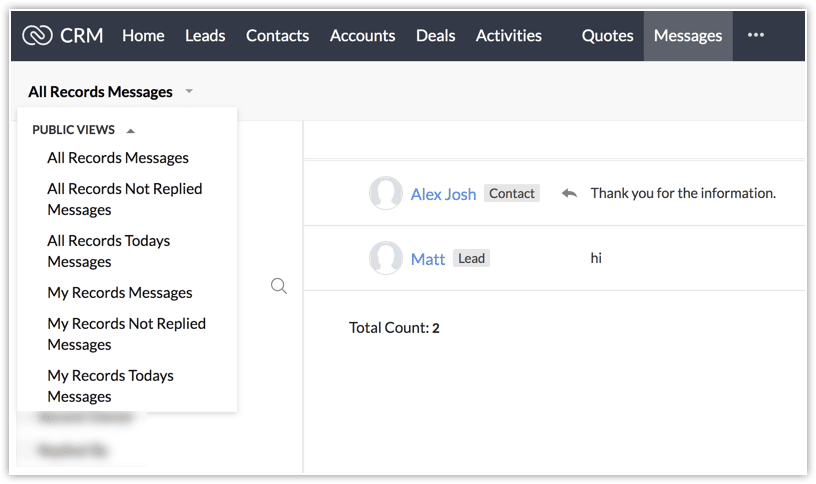
Users can also set a view for the module to see the following: messages that are unreplied, all messages sent today, all unreplied messages, among other views.
2. Receiving notifications for business messages
When an interested customer or an existing lead/contact sends a business message to your business’ WhatsApp number, a notification is sent to the Zoho CRM user via SalesSignal and popup. The push notification will be shown to the record owner.
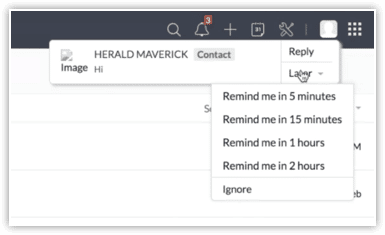
Within the push notification, the user will receive an option to be notified again after a few minutes or an hour. If the user can’t respond immediately, they can click on Remind after 15 minutes. This is not a global setting, so the user has to choose when to be reminded for each push notification they receive. Once the user clicks Ignore, the notification will close.
When multiple messages are received, the notification will display the total count of messages.

The user can also access the message notification from SalesSignal.
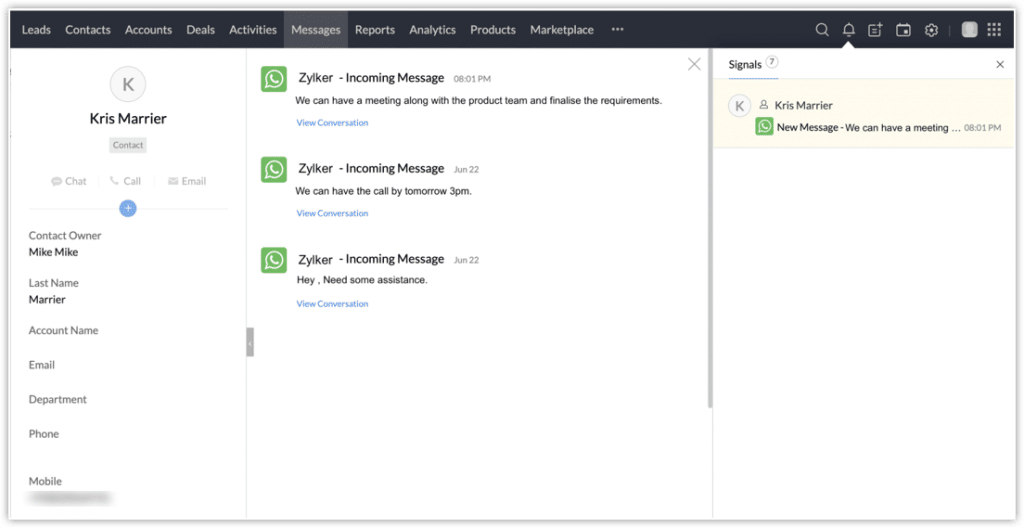
3. Replying to the business messages
The Zoho CRM users can reply to the business messages by clicking on the notification or by clicking on a record from the Messages tab. Users can also click on the View conversation from SalesSignal notification to reply. They can respond to customers by typing a message or sending a predefined business message. Merge fields can be used to pull the related value. The user can preview the value before sending the message.
NOTES:
- CRM users can reply to a message within 24 hours of receiving it. After this, the WhatsApp messaging window will be closed.
- Only the customer can start a conversation by sending a business message. A user is not allowed to send messages to leads or contacts via WhatsApp.
How to reply to a business message
a. Click on the notification to view the message. You can also go to the Messages tab and click on the record.
b. Type your message or click Predefined text to select a text. When finished, click Send.
4. Setting and managing predefined text
The Zoho CRM users have the option to create predefined texts that can be quickly sent to customers. For example:
Answers to commonly asked questions: What is the cost of the service? My order is delayed, can you help me track it?
Greetings: Hi, $[Leads.First Name]. How can I help you?
Creation of predefined texts
a. Go to the Messages tab and click on a message.
b. Next to the typing bar, click New Predefined Text. You can also click Manage and + New Predefined Text.
c. In the New Predefined Text popup, enter a name for the text (for example: Greetings).
d. Enter the text message. You can use merge fields too. Once you’re finished, click Save.
The predefined text messages can be edited or deleted by clicking the Manage button. All the texts are stored here. The users can filter them module-wise or search using the text name.
NOTE: You can’t change the module while editing a predefined text. This is to avoid errors in case merge fields have been used in the predefined texts.
To manage predefined texts:
a. Go to the Messages tab and click Predefined Text from the text area.
b. Click Manage from the drop-down list.
c. In Manage Predefined Text, hover on a text and click the Edit or Delete icon.
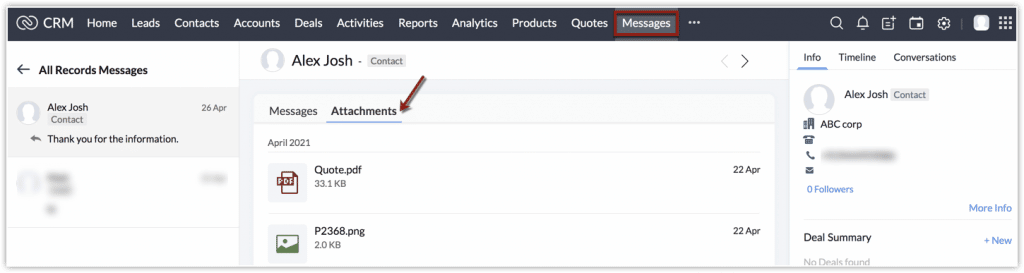
5. Sending attachments via business messages
Zoho CRM users can send attachments via text messages. They can attach up to 5 files through the following:
- Upload a file from their computer.
- Attach files from the Inventory (sales orders, quotes, purchase orders, invoices).
- Attach files from supported cloud drives (Google drive, Sky Drive, Evernote, Dropbox).
The user can either select a quote that is associated with the prospect, create a new quote, or send one of the available quotes depending on the business need and type.
Each conversation view tab is divided into two tabs: Messages and Attachments where the corresponding information is stored. You can preview and download all the attachments from here or from the messages.
To read the full article, click here.
Need help with your WhatsApp integration and/or any other third-party integrations for Zoho? Contact us now for a consultation.